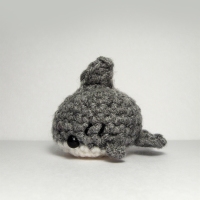
Melvin the Misunderstood Monster – Free Pattern
Melvin the Misunderstood Monster by Karissa Cole (2012 all rights reserved)
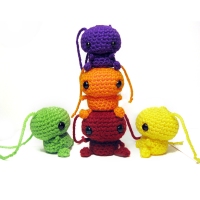
![Melvin the Misunderstood Monster [Free Pattern] by Karissa Cole](https://ea1701.wordpress.com/wp-content/uploads/2012/07/melvin-the-misunderstood-monster-free-pattern-by-karissa-cole.jpg?w=510 "Melvin the Misunderstood Monster [Free Pattern] by Karissa Cole")
He’s a nice guy. Nicer than nice. He bakes cupcakes for everyone he knows, helps little old ladies cross the street, always says ‘please’ and ‘thank you’ and is never one to make a fuss. He never says no to someone in need, and always has a smile and a cheerful thought from the bottom of his big ‘ol heart. Why, he’d even balance your checkbook if you asked! (He’s really quite good with numbers.)
But even given all this, everyone still calls Melvin a monster. And for the life of him, he can’t figure out why. He’s cute, he’s little, he’s sweet. So where do they get monster in that?
Perhaps Melvin will never know. But in the meantime he keeps his positive disposition, taking comfort in fresh coloring books, caramel apples and watching the Olympics.
Here’s how to make your very own misunderstood monster:
S U G G E S T E D M A T E R I A L S:
• Worsted weight yarn in two (2) colors such as:
* Red Heart Super Saver (1) Red [Main color] (2) Gold [Secondary color]
• G/7 4.50MM crochet hook
• One (1) pair of 10MM safety eyes (available in many craft stores or online at http://www.crscrafts.com)
• White felt
• Scissors
• Needle & thread AND/OR Hot glue
• Fiberfill stuffing
A B B R E V I A T I O N S:
MC – magic circle (magic loop/magic ring)
sc – single crochet(s)
inc – increase
dec – decrease
st(s) – stitch(es)
ch – chain
*actions in asterisks should be repeated until round completion or to the indicated stopping point in the round*
(number in parentheses indicates total number of stitches after round/row completion)
FO – fasten off
RND – Round
RW – Row
T H E P A T T E R N
Please read through pattern before you start. In addition, the PDF version of the pattern (available below) contains extra photos for the body and head sections of the pattern. And also please note that while you may use any materials you like, just keep in mind other types of yarn or hook sizes have not been tested and thus your results may differ. Using suggested materials and keeping a tight tension, the pictured Melvin is approximately 5 inches (12.7 centimeters) tall.
(Click here for PDF Download with photo walkthroughs for head and body)
(Direct PDF URL: https://ea1701.wordpress.com/wp-content/uploads/2012/08/melvin-the-misunderstood-monster-by-karissa-cole2.pdf)
Use main color unless otherwise indicated. For neater stitches I recommend staggering increases and decreases for the head.
E A R S (x2)
Worked back and forth
ch 5 (5th ch counts as turning chain; at the end of all future rows ch 1 to use as turning chain)
RW 1-3) *sc* (4)
RW 4) sc, 2inc, sc (6)
RW 5) 2sc, 2inc, 2sc (8)
RW 6) 3sc, 2inc, 3sc (10)
RW 7-21) *sc* (10)
RW 22) 3sc, 2dec, 3sc (8)
RW 23) *sc* (8)
RW 24) 2sc, 2 dec, 2sc (6)
RW 25) sc, 2dec, sc (4)
RW 26) 2dec (2)
RW 27) dec (1)
FO
Using the finished ear as a reference cut out an inner ear shape from felt. Attach to ear. Crochet around outside of ear to form a neat edge.

H O R N S (x2) Use secondary color
MC 3
RND 1) *inc* (6)
RND 2) *sc, inc* (9)
RND 3) *sc* (9)
FO
H E A D (x1)
The head is started with a foundation chain, then worked in the round.
Ch 6
Working in the back loops of the ch and starting in second ch from hook sc 5, ch 1, working along the other side of the 5 sc just made, sc 5, ch 1. You should now have 12 sts (see PDF for photo walkthrough)
From now on work in the round. Do not join rounds.
RND 1) *sc, inc* (18)
RND 2) *2sc, inc* (24)
RND 3) *3sc, inc* (30)
RND 4) *4sc, inc* (36)
RND 5-9) *sc* (36)
RND 10) *5sc, inc* (42)
RND 11) *6sc, inc* (48)
RND 12) *7sc, inc* (54)
RND 13) *4sc, dec* (45)
RND 14) *3sc, dec* (36)
RND 15) *2sc, dec* (27)
Attach eyes, horns, and ears. See photos for suggested positioning.
RND 16) *sc, dec* (18)
Stuff firmly
RND 17) *dec* (9)
FO
A R M S (x2)
MC 3
RND 1) *inc* (6)
RND 2-4) *sc* (6)
FO
T A I L (x1)
Create a pom-pom
Easy how-to: Wrap yarn of your choice around two of your fingers until you have a sizable bundle of yarn (be sure to wrap loose enough so as to not cut off circulation!). Cut yarn end. Remove wrapping of yarn from your fingers. Taking another piece of yarn (same color) tie a knot around the bundle. Cut off the edges (loops) or yarn until you have an almost pom-pom. Take a brush and brush out yarn until fluffy. (See photos)

B O D Y (x1)
The body and feet are worked as one piece, starting from the top (with a foundations chain that is joined once) and then worked down. Do not join rounds unless otherwise stated.
Ch 24, join and work in the round on 24 sts.
RND 1-3) *sc* (24)
RND 4) *5sc, inc* (28)
RND 5-6) *sc* (28)
RND 7) *6 sc, inc* (32)
RND 8-9) *sc* (32)
We will now start making the first leg by splitting our 32 sts into 2 sets of 16 stitches. Place a stitch marker at the beginning of the next round (I use the tail end of my piece)(note that this would be round 10 if we were continuing the body). Sc in the first 8 sts then, without breaking the yarn, skip all the way around to the first of the last 8 sts (see PDF for photo walkthrough)
RND 1-3) *sc* (16)
RND 4) *dec* (8)
RND 5) *dec* (4)
FO
Repeat these rounds for second leg by working the remaining 16 sts in the round (see PDF for photo walkthrough). Sew up hole between body/legs and at bottom of feet if necessary.
Cut out an egg shaped piece of felt and attach to the body. If attaching the tail via needle and thread, attach to the body now. If gluing the tail, I suggest first attaching the head to the body, then adding tail. See photos for suggested assemblage.
**Tip:If you want to soften up your Melvin try blocking the pieces; if your yarn type allows, I find running my crocheted pieces through the dryer with my laundry really softens up my amigurumi, evening out the stitches nicely. (I would recommend trying this on scraps to test first).

Once complete, be sure to give your Melvin plenty of love! And crayons. Fresh crayons. They’re important too.
**P L E A S E N O T E** This is an original design and pattern. I believe in the free sharing of techniques and ideas. Please do not abuse my desire to share with others. You are not permitted to sell any products made as the result of this pattern and/or design, nor are you permitted to sell the pattern or design. Please, if you do use this pattern or design, give credit where credit is due: direct others to this original posting so that they too can benefit.**


")


")


 by Karissa Cole 2013 all rights reserved")


")
 by Karissa Cole")


 the Rainy Day by Karissa Cole 2013")
 by Karissa Cole")
 by Karissa Cole sdvw")


 by Karissa Cole")
 by Karissa Cole")


")


 the Rainy Day by Karissa Cole 2013")


")

 by Karissa Cole 2012 all rights reserved")

I spent ages looking at Melvin trying to work out what he was – I was going for rhino/bunny hybrid, but either way he’s also ridiculously cute!
Thanks! As I made Melvin he sort of slowly took on the appearance of a bunny/dragon (or rhino) hybrid. Can’t say I did that on purpose, but it seemed to work out well :]
Sometimes the wool just has a mind of it’s own… :)
Nice job really like the body shape
Thanks
I can’t wait till I can make my own pattern / designs. These little creatures you come up with are so cute! ^ ^
^^ Thanks! I bet you’ll be making up your own designs and patterns in no time :]
I love this :). What is the size of this monster?
Thank you :)
The Melvin in the picture is just about 5 inches tall.
Reblogged this on amberstyre and commented:
Very cute dragon like creature!
How cute! Thank you so much for the pattern and the accompanying pictures. Make it so much easier to understand.
My pleasure. I’m glad you like.
Thank you for your comment :)
Just finished my Melvin,


Came out a little more chibi than I was aiming for, but still super cute, thanks so much for this pattern, very easy to follow!
You’re right, your little Melvin is indeed super cute! Thanks so much for sharing the pictures :]
Thank you so much for sharing your patterns. Especially with people like me who find it hard to purchase them.
Your designs are beautiful :)
I deeply appreciate you doing this. Thanks again-
So glad to share when I can. Thank you very much for commenting :)
how do you make the pom pom tail?
I’ve included instructions in the pattern (under TAIL (x1) Create a pom-pom. Easy howt….) but if you’d like to see another way you can check out this photo guide here http://www.wikihow.com/Make-a-Pom-Pom :)
Hello! I am a beginner with all of this.. so if anyone is willing to reply or email/talk with me to help explain some things to me that would be awesome!!
Hi Samantha!
Thanks for commenting. I personally haven’t made any instructional videos or anything, but if you’re interested in the basics of amigurumi making, you can try checking out http://www.planetjune.com/blog/tutorials/crochet-tutorials (Planet June). I’m not affiliated with this site, but I’ve known a lot of people who have learned a lot from these simple to understand tutorial videos. Hope that helps! :)
your creation is so kawaii!!i like it so much!!your creation rocks!!
Aw thanks! :D
I like this pattern, but the head portion is a bit cryptic to me :/. Would you mind posting a video tutorial, or perhaps a typed walk through. I’m sorry, I’m just so lost.
There is a photo walkthrough in the PDF :)