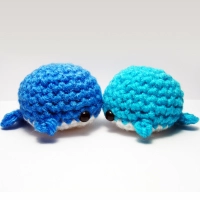
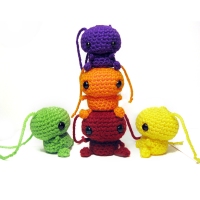
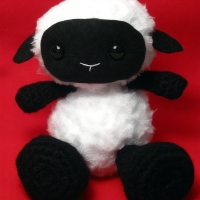
Skittles Amigurumi – Free Pattern

Give me extreme boredom, a bag of Skittles, and a few skeins of yarn and this is apparently what I come up with. Enjoy!
Skittles Crochet Pattern by Karissa Cole
Do not sell this pattern. If you wish to distribute this pattern [free of charge] either in print or on other web sites please provide a link to this original post.
This pattern is for the full size Skittle (shown in image: Red, Orange, Yellow and Green). The mini Skittle (Purple) is made with the same pattern except:
Head: Keep stitches at 24; use 6mm safety eyes
Body: Keep stitches at 12 (increase to 15 if you feel it’s necessary)
Feet: 3 hdc in second chain
Difficulty level: ** – Two stars – good for a beginner with just a bit of experience in making amigurumi.
Finished size: Approximately 2.25 inches from top to tush. But YMMV.
Suggested Materials:
F/5 3.75MM crochet hook
Small amounts of worsted weight yarn [such as Red Heart Super Saver Worsted Weight]
(2) 9mm safety eyes [if not found in your local craft store I highly recommend http://www.crscraft.com%5D
Small amounts of fiber fill stuffing
Darning needle
Scissors
Abbreviations Used:
sc – single crochet
inc – increase
dec – invisible decrease
FO – fasten off
IBL – in back loops only
hdc – half double crochet
sl st – slip stitch
Head (x1)
Woked in a continuous spiral. Do not join rounds.
Magic circle 6 stitches
Round 1) Inc in each stitch (12)
Round 2) *sc, inc* repeat around (18)
Round 3) *2 sc, inc* repeat around (24)
Round 4) *3 sc, inc* repeat around (30)
Round 5-9) sc around (maintain 30)
Round 10) *3 sc, dec* repeat around
Round 11) *2 sc, dec* repeat around FO
Body (x1)
Worked in a continuous spiral. Do not join rounds. Only round 3 is worked in the back loops.
Magic circle 6 stitches.
Round 1) Inc in each stitch (12)
Round 2) *sc, inc* repeat around (18)
Round 3) IBL sc around (18)
Round 4-7) Sc around (18) FO
Legs/Feet (x2)
Chain 3 (leave a long tail end)
3 hdc in second chain from hook
sl st into last chain
FO leaving a long tail. Thread this tail (along with the tail from your starting chain) through the Skittle body. Tie a few tight knots to secure.
Arms/Hands (x2)
Cut a length of yarn (approximately 8 inches should do, but if you’d like to be on the safe side, go a bit longer). Folding the yarn in half, tie a knot at the end (not at the free ends) leaving just a tiny loop to serve as the hand. Thread the little apendage through the body and secure.
Antennae (x2)
Similar to the arms/hands, simply cut a piece of yarn (length is up to you) and thread it through the head. Tie knots at either end to secure the yarn and/or add a decorative spin to your Skittle’s dreads.
Option: Instead of using a piece of yarn make a chain of about 12 and attach.
Assemblage:
Attach the safety eyes and stuff the head firmly. I recommend not stuffing the body with fiberfill, but rather with the loose ends of the yarn used to attach the feet and arms. Stuffing the body this way (or if your yarn ends are too short, with just a tiny bit of stuffing) makes the Skittles stackable. Once everything is appropriately stuffed, attached, and arranged, go ahead and sew on the head. . . because a decapitated Skittle is something too awful to think about for too long.
Okie doke! Your Skittle is done. Now, go forth, and make an army of amigurumi Skittles. WORLD DOMINATION BY CUTENESS! Or something. Oh, and questions or comments are welcome (about the pattern, not the world domination – I’m not supposed to give advice on taking over the planet anymore.)


")


 the Rainy Day by Karissa Cole 2013")

 by Karissa Cole 2013 all rights reserved")


 by Karissa Cole sdvw")
 by Karissa Cole")


 by Karissa Cole 2012 all rights reserved")


")


 by Karissa Cole")


")
 by Karissa Cole")


 the Rainy Day by Karissa Cole 2013")
 by Karissa Cole")


")


")

These are too cute!!! Thank you so much for the pattern!
My pleasure! :)
sweetness personified…
thanks for sharing the pattern.
Most happy to :]
Do you have a tutorial on how shoot professional fotos with the perfect lighting? :D I love this so much!
Thanks for your comment! :D
Usually for the photos I just set up my subject in front of white paper and shine a lamp right on whatever I’m photographing. I don’t have an actual tutorial, but if I make one I’d definitely post it to this blog :]
That’s amazing! I’m going to try that! :D thank you so much! WOW!
Just wanted to thank you for sharing your adorable patterns!! I haven’t attempted any of them yet…but I wanted to say thanks!
Thanks Kristi! I’m happy to share :D
Thank you for sharing this really cute pattern! :D
Thanks! Happy to :)
These are so cute! And they are perfect for a friend of mine. He just asked me to make him a cute monster and I think I’m going to make him a family of these!
That’s awesome! I hope he likes ’em :)
They kinda look like the Heartless from Kingdom Hearts! Cuties!
Thanks! I hadn’t heard of those until someone told me that shortly after I made these :D
Thanks for the pattern. I’m going to make them for my daughter.
what is a Magic circle stitch?
Hi Rebekah,
A magic circle (sometimes called a magic ring, or magic loop) is not actually a stitch; it’s simply a way of beginning a piece in the round. There are many videos on sites such as YouTube that demonstrate this technique :)
Between which row does your safety eyes attached?
Reblogged this on Neverland Adventures!.
These tiny things are so aweful
I’d made some they went to “straßenengel” group from facebook duisburg germany for kids who had no toys 😊 thanks a lot for the pattern